

P.S. Sorry there's no instructional pictures. I made this months ago, with no intention of creating a tutorial.

MATERIALS
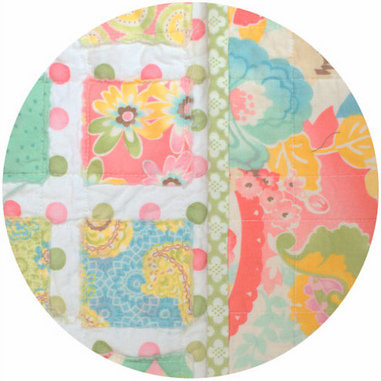
- 5 different sets of coordinating fabric. Each set should have enough fabric to cut out 5 circles about 4.5 inches in diameter.
- 1 yard off-white muslin quilting fabric
- 2 yds flannel (solid color)
- 1/4 yd contrasting flannel (for border and trim)
- batting
-pins
-marking pencil
INSTRUCTIONS
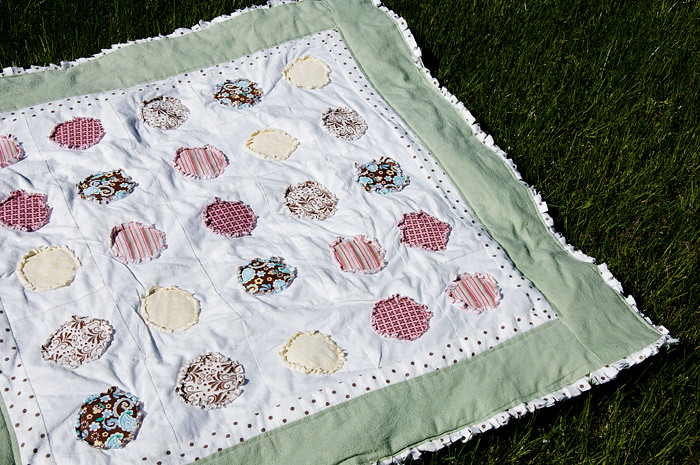
1. Start by cutting out 25 circles. Mine are 4.25 inches in diameter. I used a drinking glass as a template. If you have a rotary circle cutter on hand, use that instead.
2. Cut 25 7x7" squares from the quilting muslin. It's really important that these are true squares and are identical, so make and use a template. (Cardstock is perfect for this. If you don't have any, cut apart a cereal box.)
3. Center and pin a circle on each square.
4. Sew the circles to the squares. I sewed about a .5" in from the edge of the circle. (Later, I cut all the way around the edge of the circles, just to the seam, so the edges look raggedy and frayed.)
5. Lay out and arrange your squares on the floor, in the desired pattern.
6. Now it's time to sew them all together. You'll do this a row at a time, starting with the lower left square. Take the square next to it and put them right sides together. Sew a .5" seam down one side. Open it up and press the seam. Take the next loose square and continue until all 5 squares are sewn together and pressed.
7. Continue to sew the other 4 rows individually. MAKE SURE THERE IS ALWAYS A .5" SEAM ALLOWANCE, or else the rows aren't going to line up.
8. To sew the rows together, take the bottom two rows and put them right sides together. Match up the seams and pin, pin, pin. Sew a .5" seam down the long side, then press it. Repeat until all rows are sewed together and you have a nice, pretty 5x5 block.
9. Trim the excess bulky fabric from the seams.
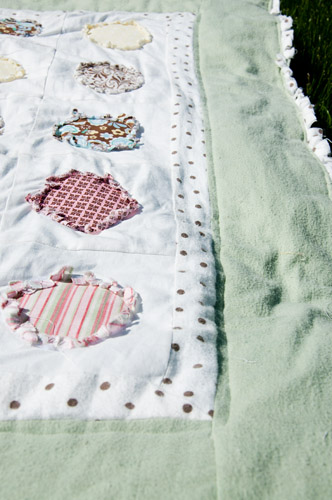
10. Using the contrasting flannel, sew a decorative border around the entire square. Mine is 1.5" wide. I mitered the corners. You should Google how to miter corners, because I'll just confuse you.
11. Using the solid flannel, sew a 4.75" wide border all around. I didn't miter the corners here, but I'd suggest you do so for a cohesive look.
12. Now you have the top piece finished! To make the back, just cut a piece of the solid colored flannel the same size as the top piece. The finished size will be about 40x41".
13. Cut a piece of batting the same size.
14. Sandwich the batting between the top and bottom quilt pieces.
15. To anchor the batting, I resewed over the circles' seams. I also sewed around the contrasting border (you can see in the last picture).
16. To finish: Fold the edges (.25") of both the top and bottom pieces and press. For each of the 4 sides of the quilt, take a 3.5" strip of the contrasting fabric and fold it lengthwise, wrong sides together. Sandwich this in the edge of the quilt so that the crease is inside where you can't see, and the raw edges are sticking out. Sew all of this (top piece of quilt, contrasting fabric, batting, and bottom piece of quilt all layered on top of each other) down the edge. Continue on the other 3 sides.
17. At this time, you can cut the edges of the circles and the contrasting fabric on the outer edge of the quilt all raggedy-like.
Done!
Whew. I hope this wasn't TOO confusing. Please let me know if you have any questions!


No comments:
Post a Comment